Running WordPress as a headless CMS inside Docker containers is one of the most practical developer setups available in 2026. You get full environment parity between local dev and production, isolated services, and a frontend decoupled from WordPress’s PHP rendering layer. This guide walks through building that stack from scratch: a WP backend container, a Next.js frontend container, WPGraphQL as the data layer, nginx as the reverse proxy, and deployment options that actually work in production.
No hand-waving. Every config block shown here runs in production.
Why Headless WordPress in Docker
The traditional WordPress monolith bundles the content model, admin UI, and rendering layer into one PHP process. That works fine at small scale, but it creates problems: PHP version mismatches across environments, slow local dev due to host-machine file I/O on wp-content, and the impossibility of running a React or Astro frontend without a separate build server.
Docker solves the environment problem. Headless solves the frontend problem. Combine them and you get:
- Identical PHP version, extensions, and wp-config between local and production
- Hot-reloading Next.js dev server talking to a live WordPress REST or GraphQL API
- Horizontal scaling of the frontend container without touching WordPress
- One nginx container handling SSL termination and routing, instead of a tangle of vhost configs
- Playwright E2E tests that run against the same containerized stack as production
Architecture Overview
The stack has four containers:
- db — MySQL 8.0, storing all WordPress data
- wordpress — PHP-FPM 8.2 running WordPress core. No Apache, just PHP-FPM over a Unix socket
- frontend — Node 20 running Next.js in dev mode locally, or a built static/SSR output in production
- nginx — Reverse proxy. Routes
/wp-admin,/wp-login.php, and/wp-jsonto the WordPress container; routes everything else to the frontend container
A named volume uploads is shared between the wordpress and nginx containers so nginx can serve media files directly without proxying them through PHP-FPM, which cuts load on the WP container.
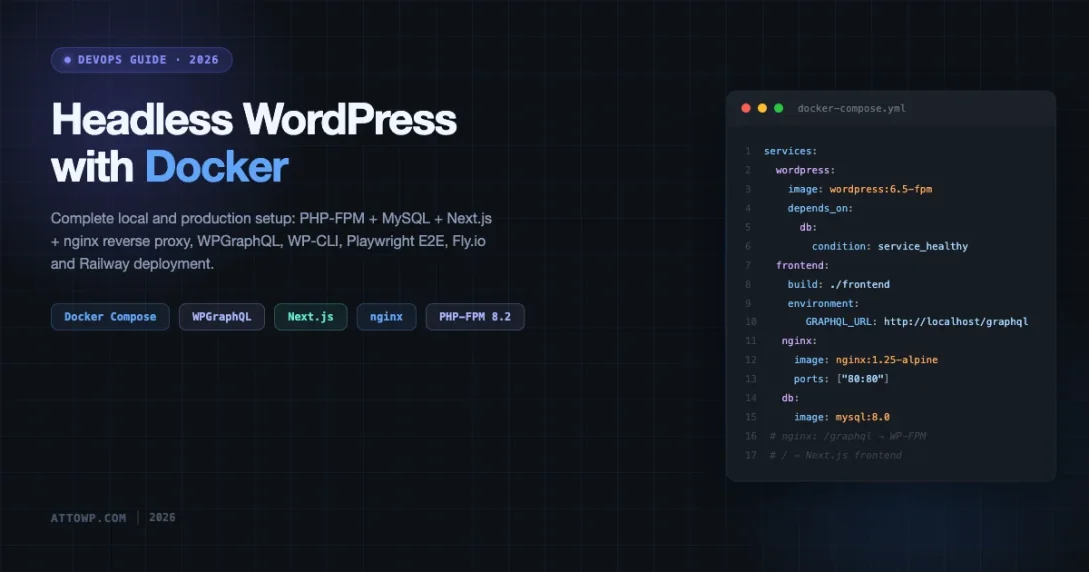
The docker-compose.yml
Here is a complete, working compose file. Copy it to the root of your project.
version: '3.9'

services:
  db:
    image: mysql:8.0
    restart: unless-stopped
    environment:
      MYSQL_ROOT_PASSWORD: ${MYSQL_ROOT_PASSWORD}
      MYSQL_DATABASE: ${MYSQL_DATABASE}
      MYSQL_USER: ${MYSQL_USER}
      MYSQL_PASSWORD: ${MYSQL_PASSWORD}
    volumes:
      - db_data:/var/lib/mysql
    networks:
      - wp_net
    healthcheck:
      test: ["CMD", "mysqladmin", "ping", "-h", "localhost"]
      interval: 10s
      timeout: 5s
      retries: 5

  wordpress:
    image: wordpress:6.5-php8.2-fpm
    restart: unless-stopped
    depends_on:
      db:
        condition: service_healthy
    environment:
      WORDPRESS_DB_HOST: db
      WORDPRESS_DB_NAME: ${MYSQL_DATABASE}
      WORDPRESS_DB_USER: ${MYSQL_USER}
      WORDPRESS_DB_PASSWORD: ${MYSQL_PASSWORD}
      WORDPRESS_TABLE_PREFIX: wp_
      WORDPRESS_CONFIG_EXTRA: |
        define('WP_HOME', '${SITE_URL}');
        define('WP_SITEURL', '${SITE_URL}/wp');
        define('WP_CONTENT_URL', '${SITE_URL}/wp-content');
        define('DISABLE_WP_CRON', true);
        define('WP_DEBUG', ${WP_DEBUG:-false});
    volumes:
      - wp_core:/var/www/html
      - uploads:/var/www/html/wp-content/uploads
      - ./wp-content/plugins:/var/www/html/wp-content/plugins
      - ./wp-content/themes:/var/www/html/wp-content/themes
      - ./php.ini:/usr/local/etc/php/conf.d/custom.ini
    networks:
      - wp_net

  frontend:
    build:
      context: ./frontend
      target: development
    restart: unless-stopped
    environment:
      NEXT_PUBLIC_WP_URL: ${SITE_URL}
      NEXT_PUBLIC_GRAPHQL_URL: ${SITE_URL}/graphql
    volumes:
      - ./frontend:/app
      - /app/node_modules
    networks:
      - wp_net
    ports:
      - "3000:3000"

  nginx:
    image: nginx:1.25-alpine
    restart: unless-stopped
    depends_on:
      - wordpress
      - frontend
    ports:
      - "80:80"
      - "443:443"
    volumes:
      - ./nginx/default.conf:/etc/nginx/conf.d/default.conf:ro
      - uploads:/var/www/html/wp-content/uploads:ro
      - wp_core:/var/www/html:ro
      - ./nginx/certs:/etc/nginx/certs:ro
    networks:
      - wp_net

volumes:
  db_data:
  wp_core:
  uploads:

networks:
  wp_net:
    driver: bridge
Create a .env file alongside the compose file:
MYSQL_ROOT_PASSWORD=supersecret
MYSQL_DATABASE=wordpress
MYSQL_USER=wpuser
MYSQL_PASSWORD=wppassword
SITE_URL=http://localhost
WP_DEBUG=true
Nginx Reverse Proxy Configuration
The nginx config is the real orchestration layer. It decides which container handles each request path.
# nginx/default.conf

upstream wordpress_fpm {
    server wordpress:9000;
}

upstream frontend_app {
    server frontend:3000;
}

server {
    listen 80;
    server_name _;
    root /var/www/html;
    index index.php;

    client_max_body_size 64m;

    # Serve uploaded media directly from the shared volume
    location /wp-content/uploads/ {
        alias /var/www/html/wp-content/uploads/;
        expires 30d;
        add_header Cache-Control "public, immutable";
    }

    # WordPress admin and login
    location ~ ^/(wp-admin|wp-login\.php|wp-cron\.php) {
        try_files $uri $uri/ /index.php?$args;
        location ~ \.php$ {
            fastcgi_pass wordpress_fpm;
            fastcgi_index index.php;
            fastcgi_param SCRIPT_FILENAME $document_root$fastcgi_script_name;
            include fastcgi_params;
        }
    }

    # WP REST API and WPGraphQL
    location ~ ^/(wp-json|graphql) {
        try_files $uri $uri/ /index.php?$args;
        location ~ \.php$ {
            fastcgi_pass wordpress_fpm;
            fastcgi_index index.php;
            fastcgi_param SCRIPT_FILENAME $document_root$fastcgi_script_name;
            include fastcgi_params;
        }
    }

    # XML-RPC for WP-CLI compatibility
    location = /xmlrpc.php {
        fastcgi_pass wordpress_fpm;
        fastcgi_param SCRIPT_FILENAME $document_root$fastcgi_script_name;
        include fastcgi_params;
    }

    # PHP files in WP core
    location ~ \.php$ {
        fastcgi_pass wordpress_fpm;
        fastcgi_param SCRIPT_FILENAME $document_root$fastcgi_script_name;
        include fastcgi_params;
    }

    # Everything else goes to Next.js
    location / {
        proxy_pass http://frontend_app;
        proxy_http_version 1.1;
        proxy_set_header Upgrade $http_upgrade;
        proxy_set_header Connection 'upgrade';
        proxy_set_header Host $host;
        proxy_set_header X-Real-IP $remote_addr;
        proxy_set_header X-Forwarded-For $proxy_add_x_forwarded_for;
        proxy_set_header X-Forwarded-Proto $scheme;
        proxy_cache_bypass $http_upgrade;
    }
}
The key routing decisions are deliberate. /wp-json and /graphql go through PHP-FPM. /wp-content/uploads bypasses PHP entirely and is served from the shared volume. All other paths proxy to Next.js, which handles its own routing from there.
CORS Headers for GraphQL
Browser-side GraphQL queries from a different port or domain need CORS headers. Add these inside the /graphql location block:
location /graphql {
    if ($request_method = 'OPTIONS') {
        add_header 'Access-Control-Allow-Origin' 'http://localhost:3000';
        add_header 'Access-Control-Allow-Methods' 'GET, POST, OPTIONS';
        add_header 'Access-Control-Allow-Headers' 'Authorization,Content-Type';
        add_header 'Access-Control-Max-Age' 1728000;
        return 204;
    }
    add_header 'Access-Control-Allow-Origin' 'http://localhost:3000' always;

    try_files $uri $uri/ /index.php?$args;
    location ~ \.php$ {
        fastcgi_pass wordpress_fpm;
        fastcgi_param SCRIPT_FILENAME $document_root$fastcgi_script_name;
        include fastcgi_params;
    }
}
Replace http://localhost:3000 with your actual frontend domain in production. Never use * if the frontend sends auth cookies or Authorization headers.
Installing and Configuring WPGraphQL
WPGraphQL is the plugin that exposes a /graphql endpoint on your WordPress install. Since we mount ./wp-content/plugins as a volume, you have two ways to install it.
Option 1: WP-CLI inside the container
docker compose exec wordpress bash -c \
  "wp plugin install wp-graphql --activate --allow-root"
Option 2: Install at image build time
If you extend the WordPress image with a custom Dockerfile, install WPGraphQL at build time:
FROM wordpress:6.5-php8.2-fpm

RUN apt-get update && apt-get install -y unzip curl \
    && rm -rf /var/lib/apt/lists/*

# Install WP-CLI
RUN curl -o /usr/local/bin/wp \
      https://raw.githubusercontent.com/wp-cli/builds/gh-pages/phar/wp-cli.phar \
    && chmod +x /usr/local/bin/wp

# Install WPGraphQL
RUN mkdir -p /usr/src/wordpress/wp-content/plugins \
    && cd /usr/src/wordpress/wp-content/plugins \
    && curl -L \
      https://github.com/wp-graphql/wp-graphql/releases/latest/download/wp-graphql.zip \
      -o wp-graphql.zip \
    && unzip wp-graphql.zip \
    && rm wp-graphql.zip
Once WPGraphQL is active, go to GraphQL > Settings in the WordPress admin and enable the GraphiQL IDE so you can test queries directly. Keep it enabled locally; disable it in production.
A basic WPGraphQL query to verify your setup:
query GetRecentPosts {
  posts(first: 5) {
    nodes {
      id
      title
      slug
      date
      excerpt
      featuredImage {
        node {
          sourceUrl
          altText
        }
      }
    }
  }
}
Run this against http://localhost/graphql. You should see your posts returned as JSON.
Environment Variables: WP_HOME and WP_SITEURL
Headless WordPress needs specific environment variables to generate correct URLs. The classic problem is WordPress generating media URLs or links pointing to the internal Docker hostname instead of your public domain.
In the compose file above, WORDPRESS_CONFIG_EXTRA injects PHP constants into wp-config.php:
define('WP_HOME', 'https://yourdomain.com');        // Public-facing URL
define('WP_SITEURL', 'https://yourdomain.com/wp'); // Where WP core files live
define('WP_CONTENT_URL', 'https://yourdomain.com/wp-content');
The split between WP_HOME and WP_SITEURL is intentional. Your frontend lives at /, so WP_HOME points to the root domain. WordPress core files are served from /wp, so WP_SITEURL includes the /wp path. This setup means wp-login.php and wp-admin resolve correctly at https://yourdomain.com/wp/wp-login.php rather than conflicting with your frontend routes.
To apply these values to an already-running installation via WP-CLI:
docker compose exec wordpress wp option update home 'https://yourdomain.com' --allow-root
docker compose exec wordpress wp option update siteurl 'https://yourdomain.com/wp' --allow-root
Local Development Workflow
Starting the full stack is one command:
docker compose up -dThe first run takes 2-3 minutes as images pull and MySQL initializes. Subsequent starts are under 10 seconds.
Hot Reload
The Next.js container mounts ./frontend as a volume, so file changes in your local editor trigger the Next.js Fast Refresh cycle inside the container. You do not need to rebuild the container for frontend code changes. PHP changes in ./wp-content are also picked up immediately since those directories are mounted live.
Running WP-CLI Commands
WP-CLI works inside the WordPress container. Common patterns:
# List installed plugins
docker compose exec wordpress wp plugin list --allow-root

# Open a shell inside the WP container
docker compose exec wordpress bash

# Search-replace after cloning a production database
docker compose exec wordpress wp search-replace \
  'https://yourdomain.com' 'http://localhost' --allow-root

# Export the database
docker compose exec wordpress wp db export /tmp/dump.sql --allow-root
docker compose cp wordpress:/tmp/dump.sql ./dump.sql
The --allow-root flag is required because the WordPress container runs as root by default. In production, switch to a non-root user in the Dockerfile. Locally, it is fine as-is.
Viewing Logs
# Follow all container logs
docker compose logs -f

# Follow nginx access logs only
docker compose logs -f nginx

# Follow PHP-FPM output
docker compose logs -f wordpress
Playwright E2E Tests Against the Containerized Stack
Because the entire stack runs in Docker, Playwright tests run against the same services in CI as they do locally. No mocking needed. Add a playwright service to your compose file:
  playwright:
    image: mcr.microsoft.com/playwright:v1.44.0-jammy
    working_dir: /tests
    volumes:
      - ./e2e:/tests
    networks:
      - wp_net
    depends_on:
      - nginx
    environment:
      BASE_URL: http://nginx
      WP_ADMIN_USER: admin
      WP_ADMIN_PASS: ${WP_ADMIN_PASS}
    profiles:
      - testing
A minimal test file at ./e2e/home.spec.ts:
import { test, expect } from '@playwright/test';

const BASE_URL = process.env.BASE_URL || 'http://localhost';

test('homepage loads with correct title', async ({ page }) => {
  await page.goto(BASE_URL);
  await expect(page).toHaveTitle(/My Site/);
});

test('GraphQL endpoint responds', async ({ request }) => {
  const response = await request.post(`${BASE_URL}/graphql`, {
    data: { query: '{ generalSettings { title } }' }
  });
  expect(response.ok()).toBeTruthy();
  const body = await response.json();
  expect(body.data.generalSettings.title).toBeTruthy();
});

test('wp-admin redirects to login', async ({ page }) => {
  await page.goto(`${BASE_URL}/wp/wp-admin/`);
  await expect(page).toHaveURL(/wp-login/);
});
Run the tests:
docker compose --profile testing run --rm playwright npx playwright testIn GitHub Actions, add the same compose file to your CI workflow and run this command in the test step. The Playwright container connects to the nginx container over the wp_net bridge network using the service name as hostname.
Production Deployment Options
Three deployment targets work well with this Docker setup.
Fly.io with Machines
Fly.io runs Docker containers as Machines (lightweight VMs). Deploy with:
fly launch --no-deploy
fly volumes create wp_uploads --size 10
fly secrets set \
  MYSQL_ROOT_PASSWORD=... \
  MYSQL_PASSWORD=... \
  SITE_URL=https://yourdomain.com
fly deploy
MySQL runs as a separate Machine or you use a managed database (PlanetScale, Fly Postgres). Uploads volume mounts to the WordPress Machine. The frontend runs as a separate Fly app.
Railway
Railway supports Docker Compose deployments. Point Railway at your repository and it detects the compose file. Railway provides managed MySQL out of the box, so remove the db service from your compose file and use the Railway-provided DATABASE_URL. Railway provides a private network between services, so the nginx-to-wordpress connection works over Railway’s internal DNS.
Set environment variables in Railway’s dashboard:
SITE_URL=https://yourproject.up.railway.app
MYSQL_DATABASE=railway
MYSQL_USER=root
MYSQL_PASSWORD=${{MySQL.MYSQL_PASSWORD}}
Self-Hosted VPS with Docker and Caddy
On a self-hosted VPS (DigitalOcean, Hetzner, Linode), run Docker Compose directly on the host and place Caddy in front for SSL termination. Caddy’s automatic HTTPS via Let’s Encrypt removes certificate management overhead.
Sample Caddyfile on the host:
yourdomain.com {
    handle /wp-admin* {
        reverse_proxy localhost:8080
    }
    handle /graphql* {
        reverse_proxy localhost:8080
    }
    handle /wp-json* {
        reverse_proxy localhost:8080
    }
    handle {
        reverse_proxy localhost:3000
    }
}
Change the nginx container to listen on 8080:80 instead of 80:80 so Caddy owns ports 80 and 443 on the host. The frontend Next.js app stays on 3000.
Common Gotchas
File Permissions on the Uploads Volume
The WordPress container runs as www-data (uid 33), but Docker creates volumes owned by root by default. WordPress cannot write uploaded media to the volume.
Fix it in your Dockerfile or via a one-time command:
docker compose exec wordpress chown -R www-data:www-data /var/www/html/wp-content/uploadsOr bake it into your Dockerfile:
RUN chown -R www-data:www-data /var/www/html/wp-content/uploadsIf you see Unable to create directory in the WordPress admin media uploader, this is always the cause.
WP Cron in a Container
WordPress’s default cron system fires on page load. In a headless setup, the frontend container does not load PHP pages, so scheduled tasks stop running.
The compose file sets DISABLE_WP_CRON = true. Replace it with a real cron job on the host:
# Host crontab entry
*/5 * * * * docker compose -f /srv/myproject/docker-compose.yml \
  exec -T wordpress wp cron event run --due-now --allow-root 2>&1
Or add a dedicated wpcron service to your compose file:
  wpcron:
    image: wordpress:6.5-php8.2-fpm
    restart: unless-stopped
    depends_on:
      - wordpress
    volumes:
      - wp_core:/var/www/html
    networks:
      - wp_net
    entrypoint: |
      /bin/sh -c 'while true; do
        wp cron event run --due-now --allow-root --path=/var/www/html;
        sleep 300;
      done'
Media URLs Pointing to the Wrong Domain
After a database import from production, media URLs point to your production domain instead of http://localhost. Run a search-replace:
docker compose exec wordpress wp search-replace \
  'https://yourdomain.com' \
  'http://localhost' \
  --skip-columns=guid \
  --allow-root
The --skip-columns=guid flag prevents the GUID column from being modified, which matters for RSS feeds and post deduplication.
MySQL Not Ready When WordPress Starts
The compose file uses a healthcheck on db and depends_on: condition: service_healthy on the wordpress service. Without this, WordPress tries to connect to MySQL before the database accepts connections and crashes on first boot.
If you see Error establishing a database connection on first run, check whether MySQL is healthy:
docker compose ps
docker compose logs db
Production php.ini Tuning
The compose file mounts ./php.ini into the container. Use this for sensible PHP limits in production:
; php.ini
[PHP]
memory_limit = 256M
upload_max_filesize = 64M
post_max_size = 64M
max_execution_time = 300
max_input_time = 300
opcache.enable = 1
opcache.memory_consumption = 128
opcache.interned_strings_buffer = 8
opcache.max_accelerated_files = 10000
opcache.revalidate_freq = 60
OPcache is off by default in the official WordPress Docker image for development. Enable it in production for a 30-50% reduction in PHP processing time per request.
Frontend Dockerfile for Next.js
The compose file references ./frontend/Dockerfile with build targets. Here is a multi-stage Dockerfile that supports both local dev (hot reload) and production (standalone output):
FROM node:20-alpine AS base
WORKDIR /app
COPY package.json package-lock.json ./
RUN npm ci

# Development target: hot reload with volume mount
FROM base AS development
COPY . .
EXPOSE 3000
CMD ["npm", "run", "dev"]

# Build step
FROM base AS builder
COPY . .
ENV NEXT_TELEMETRY_DISABLED 1
RUN npm run build

# Production target: minimal image
FROM node:20-alpine AS production
WORKDIR /app
ENV NODE_ENV production
ENV NEXT_TELEMETRY_DISABLED 1
COPY --from=builder /app/.next/standalone ./
COPY --from=builder /app/.next/static ./.next/static
COPY --from=builder /app/public ./public
EXPOSE 3000
CMD ["node", "server.js"]
Set output: 'standalone' in your next.config.js to enable the standalone build. This copies only the required Node.js modules into the output, producing a Docker image under 200MB.
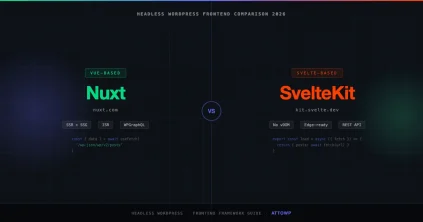
Using Nuxt.js Instead of Next.js
\n\n\n\nThe architecture works identically with Nuxt.js. Swap the frontend service’s Dockerfile and the compose target; the nginx config does not change because the proxy does not care what framework is behind port 3000.
\n\n\n\nThe key Nuxt.js config for consuming WPGraphQL is in nuxt.config.ts:
// nuxt.config.ts\nexport default defineNuxtConfig({\n runtimeConfig: {\n public: {\n graphqlUrl: process.env.NEXT_PUBLIC_GRAPHQL_URL || 'http://nginx/graphql'\n }\n },\n // For SSR with containerized WP, the server-side fetch hits nginx directly\n // which avoids double-proxying through the public URL\n nitro: {\n routeRules: {\n '/wp-admin/**': { proxy: 'http://nginx/wp-admin/**' }\n }\n }\n})On the Nuxt side, use useAsyncData with a raw fetch call to the GraphQL endpoint, or install the official @nuxtjs/apollo module for a full Apollo Client setup. The compose file above already passes NEXT_PUBLIC_GRAPHQL_URL to the frontend container — rename it to NUXT_PUBLIC_GRAPHQL_URL in your .env and adjust the Nuxt runtimeConfig key accordingly.
One thing to watch with Nuxt and Docker: Nuxt’s dev server binds to localhost by default inside the container, which makes it unreachable from nginx. Fix this by passing --host 0.0.0.0 in your dev command:
# In frontend/package.json\n\"scripts\": {\n \"dev\": \"nuxt dev --host 0.0.0.0 --port 3000\"\n}Next.js also benefits from the same flag in some setups, but it binds to all interfaces by default in most versions. With Nuxt, the flag is mandatory.
\n\n\n\nFirst-Run Checklist
\n- Copy the compose file, nginx config, and
.envinto your project root - Run
docker compose up -d - Wait for
docker compose psto show all services asUp - Navigate to
http://localhost/wp/wp-adminand complete the WordPress install - Install WPGraphQL via WP-CLI or the admin dashboard
- Set
WP_HOME,WP_SITEURL, andWP_CONTENT_URLviaWORDPRESS_CONFIG_EXTRAin your.env - Verify the GraphQL endpoint at
http://localhost/graphqlwith a simple introspection query - Check that the Next.js dev server inside the frontend container is running on port 3000
- Make a GraphQL query from a Next.js page component to confirm end-to-end connectivity
- Run
docker compose --profile testing run --rm playwright npx playwright testto validate the full stack
Next Steps
This stack gives you a production-ready headless WordPress setup with full local parity. The nginx routing layer keeps WordPress admin accessible while the frontend handles all public-facing traffic. WPGraphQL provides a typed, queryable API layer that works well with Next.js’s static generation and incremental static regeneration.
The biggest operational wins come from the healthcheck-gated MySQL startup, the shared uploads volume that keeps media serving fast, and the explicit WP cron replacement. Get those three right and the rest of the stack runs without surprises. If you are newer to Docker and want to start with a simpler WordPress-only container setup before adding the headless layer, the Docker for WordPress local development guide covers the fundamentals in detail.
For a real project, consider adding Redis as an object cache container and configuring the WP Redis plugin to point at it. The compose pattern handles that addition cleanly: one new service, one new volume, one plugin install. That is the advantage of the containerized approach over traditional hosting. When your frontend makes authenticated requests to the WP REST API or GraphQL endpoint, review the WordPress REST API authentication methods comparison to choose the right auth strategy for your use case. For a deeper look at WPGraphQL’s querying capabilities and schema extension, see the official WPGraphQL documentation.
\n\n\n\nOne more thing worth calling out: the multi-stage Dockerfile pattern shown in the Next.js section applies equally to TypeScript compilation, Astro’s build step, or any other Node-based frontend. The compose file’s target field is how you select between dev and production builds without maintaining two separate compose files. Keep your local .env out of version control, use a secrets manager or CI environment variables for production credentials, and you have a setup that scales from a solo project to a multi-developer team with no architectural changes.
Docker Docker Compose headless wordpress Next.js WPGraphQL
Last modified: April 30, 2026


")

")


")

")
